Curriculum 'endoACRO - Site User Training'
2. Visit calendar Download PDF
1 Visit calendar
- When a patient has been successfully added to the system the user is taken to the visit calendar for that patient. The visit calendar displays the two first visits for the patient.
- The date of the background visit is default set to the ACROSTUDY start date. Click the date if you want to change the date.
- A return visit is suggested with proposed visit date one year later. If there are more frequent titration visits or lab visits you add those by clicking the Add visit link in the visit calendar (top right corner) and selecting the type of visit in the visit administration.
- The patient header displays patient information. The Patient ID is automatically assigned by the system.
- Depending on the patient settings different forms will be available in the visit calendar.
2 Visit calendar sections
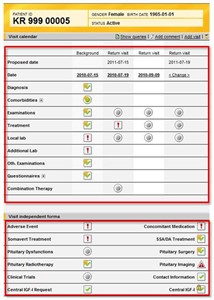
- The Visit calendar page consists of a visit dependent and a visit independent section. You access the forms by clicking the status icon. The different status icons are explained at the bottom of the page.
- The visit dependent section displays the scheduled visits and their forms according to patient status etc. Click the status icon to open a specific visit form.
Visit forms are sometimes grouped into a form group, for example Comorbidities. If a form group is only available on a specific visit, and that is the current visit, the form group is expanded, otherwise it is collapsed. Click the plus sign in front of the form group to view all forms in the group. - The visit independent section displays the available log forms depending on patient settings. Click the status icon to open a specific log form and view or add new log entries.
3 Visit administration
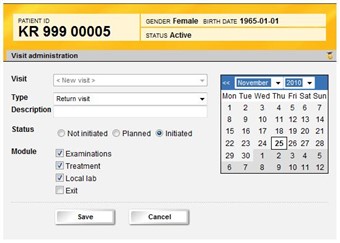
- On the Visit administration page you can initiate or plan a visit, add a new visit, change visit dates and add/remove visit forms. To administrate a visit, click the visit date in the visit calendar for a visit that has been initiated or planned or the link <change> for a visit that has not yet been initiated or planned.
- Add a new visit: Return visits are automatically created in the calendar. As soon as a return visit has been initiated a new return visit appears in the calendar.
It is also possible to manually add other visit types in the calendar. Available visit types are:
1. Return visit
2. Previous exam
3. Laboratory
4. Exit - To add a new visit other than a standard return visit for example for titration visits, click the Add visit link in the visit calendar, select the type in the drop-down list, set status to "Initiated", select the date, finally click "Save".